Manual Grade Laser Level
| Setting Up and Using a Manual Grade Laser | |
| Manual Grade |  |
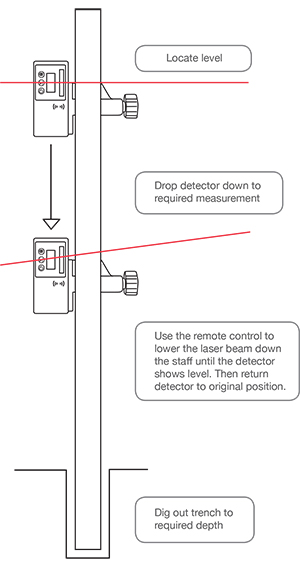
| Step 1 Set up your laser level with the desired axis that you want to use facing the same direction that you will be operating. Turn the laser level on and allow it automatically level and begin rotating in the normal horizontal mode. When the laser level has started to rotate, locate the laser beam with your laser detector attached to the grade rod. |
|
| Step 2 Using the laser level control panel or remote control (if supplied), press the manual/grade mode button to deactivate the automatic leveling sensors and place the laser into manual/grade mode. |
|
|
Step 3 If you wanted to do a manual slope of a 2 inch drop for every 100 foot. You would need to measure 100 feet away from the laser in the direction you want your slope. Take a reading at this distance at level on your measuring rod. Then lower the receiver down two inches on the measuring rod and tighten receiver to clamp. Using the up down arrow on the control panel (or optional remote control) you would press the down arrow until the laser lowers and is positioned in back into the center of the receiver. |
|
|
Step 4 |
|
|
Step 5 |
|
